Development preview — content and features are still being refined.
 Items
Items · Items
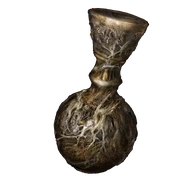
Imbued Sword Key
Items
Each key opens one eligible sending gate and is spent at its imp statue. Ordinary Stonesword Keys cannot replace it.
Reference values
- Type
- Key
About this item
Each key opens one eligible sending gate and is spent at its imp statue. Ordinary Stonesword Keys cannot replace it.
At The Four Belfries, Night Sky Unceasing reaches an isolated Nokron section with Mottled Necklace. It does not unlock the main Nokron route after Radahn.
Precipice of Anticipation returns to the starting chapel area. Crumbling Lands reaches an isolated Farum Azula section, rather than the main path through that region.
Technical details
- facts:
- Entry 1:
- group: Item Type
- label:
- value: Key
- Entry 2:
- group: Effect
- label:
- value: Unseals sending gate, but disappears upon use
- Entry 1:
In-game description
Stone key shaped like a sword.
A special item, imbued with rich blue magic.
Breaks the seal on the imp statues guarding the sending gates enshrined in each belfry, but remains embedded in the statue after use, meaning it can only be used once as an item.
Think well before using one.
Where to find
Highest belfry chest
Liurnia of the Lakes
Starting Site of Grace: The Four Belfries
- Climb the western Liurnia plateau to The Four Belfries and activate its grace at the top of the hill.
- Open the chest at the highest belfry for one Imbued Sword Key. That highest structure holds the key; the three lower belfries hold the destination gates.
Rooftop corpse
Raya Lucaria Academy
Starting Site of Grace: Debate Parlor
- At Temple Quarter in western Liurnia, ride north to the rocky island where Glintstone Dragon Smarag is resting. Take the Academy Glintstone Key from the corpse behind the dragon; fighting Smarag is optional.
- Examine the seal at South Raya Lucaria Gate with the key in your inventory. At Main Academy Gate, ride the lift up and climb the stairs past the two sorcerers into the church. Activate Church of the Cuckoo grace in its side passage.
- Leave through the side passage into the graveyard. Follow the descending path across the wooden bridge, then climb the path on the right. Watch for enemies grabbing at you from the ground.
- At the far end, go through the passage to the huge waterwheel. Ride an ascending platform and step off at the upper landing. Enter the building on the left for Schoolhouse Classroom grace; riding down goes to a different area.
- Leave the classroom and follow the corridor through the sorcerers to the large room with a Living Jar. Use the corridor on its right, climb the stairs and continue upstairs to the boss fog.
- Defeat Red Wolf of Radagon and activate Debate Parlor grace. Leave into the open courtyard, keeping the large curved staircase on your right in view.
- Leave Debate Parlor into the courtyard. Turn left, climb the rubble and stairs, then jump the left railing onto the next staircase. Go up those steps and jump the next left railing to the roofs.
- Follow the roof south past the Marionettes and climb the ladder on the building to the right. At the top, cross the elevated path carefully while dealing with the sorcerer and flying enemies.
- Go around the right side of the building at the far end and drop to the roof behind it. Descend the roofs to the north, then turn west toward the round Church of the Cuckoo roof.
- Before dropping into Church of the Cuckoo, follow the eastern rooftop ledge to the corpse holding Imbued Sword Key.
- The spare Academy Glintstone Key is on a chandelier inside the church and is a different item. Rennala is unnecessary for this rooftop key.
Sellia sealed chest
Caelid
Starting Site of Grace: Sellia Under-Stair
- From Southern Aeonia Swamp Bank, follow the road north through Sellia Gateway. Watch for the giant throwing rocks above the gateway. Gowry's wooden shack is off the road on the right, before the town.
- Continue north into Sellia, Town of Sorcery. Activate Sellia Under-Stair on the southwestern edge and follow the main street north, watching for sorcerers appearing beside the buildings.
- Climb the stairs at the far end toward the golden sapling and the sealed upper gate. The large roots beside these steps provide the way onto the roofs.
- Near the sapling, look southwest through the broken railing for a root leading toward the nearest candle tower. Follow it, climb the tower ladder and interact with the flame at the top.
- Return to the upper steps and use the root again, this time stepping onto the adjoining roofs. Work south and east across the roofs and branches toward the eastern tower. Use Torrent's double jump for the gaps and climb the ladder to light its flame.
- From that eastern roof route, head back across the connecting roots and roofs toward the southern tower on the western side. The narrow approach has a corpse with a Stonesword Key. Climb the ladder and light the third flame.
- All three flames remove the town's different blue barriers. Return to ground level to collect the particular reward you came for; lighting the towers does not automatically put the chest items in your inventory.
- Return to the eastern sealed chest area near the Twinsage sorcerer. Open the chest that was behind the town's barrier for Imbued Sword Key.
- Night Comet in the central alcove and the northwestern boss room have different rewards. Check the pickup name before leaving.
Chest below Castle-Lord's Chamber
Castle Ensis
Starting Site of Grace: Castle-Lord's Chamber
- After defeating Starscourge Radahn and Mohg, Lord of Blood, touch the withered arm in Miquella's cocoon at Mohgwyn Palace. Leave the arrival cave and activate Gravesite Plain grace.
- From Three-Path Cross, follow the eastern road over Ellac Greatbridge to Castle Front. Cross the northeastern bridge into Castle Ensis, passing the Troll Knight at the far end.
- Follow the path left at the top. Soldiers and dogs wait around the fires and stairway, so draw them out before climbing farther.
- Continue through the cave beyond the first campfire. Climb the ledges at its far exit, then follow the uphill path past the patrolling Black Knight.
- At the top is a closed gate with Miquella's Cross beside it. Activate Castle Ensis Checkpoint grace before attempting the detour.
- With the closed gate ahead, follow the wall to the right to the soldier crouching at the ledge. Drop to the ledge below, then into the hole leading to the flooded cave. Three dogs attack inside.
- Leave the cave and turn left toward the waterfall. Jump across the rock platforms, continue through the river arch and climb the ladder beside the falling water.
- Enter the room at the top, watching for an ambush on the left. Cross to the gate mechanism and turn it to open the shortcut back to Checkpoint grace.
- Climb the stairs and cross the guarded bridge. Continue past the dog ambush and spellcasting nobles to the stairs leading up toward the chapel.
- Moonrithyll, Carian Knight guards the chapel entrance. Defeat him or move past him carefully; the shield stairs and chapel altar are separate pickups here.
- Pass through the chapel behind Moonrithyll and continue along the castle's rising main route. Get past the sorcerers and the Black Knight guarding the final lift.
- Ride the final lift and activate Castle-Lord's Chamber. Before entering Rellana's fog, use the western opening leading back toward the lift.
- Ride down and enter the tower to the southwest. Open the chest inside for the key. Rellana does not need to be defeated for this copy.
Notes
- Each key opens one eligible sending gate and is spent at its imp statue. Ordinary Stonesword Keys cannot replace it.
- At The Four Belfries, Night Sky Unceasing reaches an isolated Nokron section with Mottled Necklace. It does not unlock the main Nokron route after Radahn.
- Precipice of Anticipation returns to the starting chapel area. Crumbling Lands reaches an isolated Farum Azula section, rather than the main path through that region.
- The separate gate west of Highroad Cross reaches the small Rauh area containing Verdigris Discus. It is not the upper Rauh route through Shadow Keep.
- Read the inscription before spending a key. Opening one gate does not open the others, but a gate already unlocked can be used again without spending another key.
- The Castle Ensis chest gives the same key type used at the earlier gates. Obtaining that copy does not force you to spend it at the nearby Realm of Shadow gate.
- The four selected fixed copies are the highest-belfry chest, Raya Lucaria rooftop corpse, Sellia sealed chest and Castle Ensis chest. Neither an Academy Glintstone Key nor a gaol key serves the same purpose.