Development preview — content and features are still being refined.
 Items
Items · Items
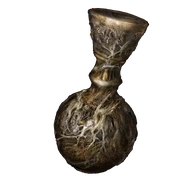
Ritual Pot
Items
There are ten Ritual Pot containers. Their capacity is separate from Cracked Pots and Hefty Cracked Pots.
Reference values
- Type
- Key
About this item
There are ten Ritual Pot containers. Their capacity is separate from Cracked Pots and Hefty Cracked Pots.
Using or storing a filled ritual pot frees its container. You need fresh ingredients to make another item.
The containers carry into later journeys without raising the ten-container limit.
Technical details
- facts:
- Entry 1:
- group: Item Type
- label:
- value: Key
- Entry 2:
- group: Effect
- label:
- value: Container required for crafting ritual pot items
- Entry 1:
In-game description
This empty pot somehow mends itself when broken.
Special item with greater durability than a cracked pot.
Essential vessel for crafting ritual pot items.
The materials and magics sealed within deploy their effects when the pot is thrown.
Where to find
Pidia in Caria Manor
Liurnia of the Lakes
Starting Site of Grace: Royal Moongazing Grounds
Before you go
- Have 1,500 runes.
- Defeat Royal Knight Loretta to reach Three Sisters and the rooftop route to Pidia.
- Buy from Pidia while he is alive; if his scripted death has occurred, use his bell bearing at the Twin Maiden Husks for remaining stock.
- Defeat Royal Knight Loretta and leave Caria Manor into the Three Sisters.
- Turn left outside the manor and follow the cliff above its rooftops until you reach the blue flask scarab beside the drop.
- Use the roof and wooden ledges below to descend safely to the rooftop opening. Climb down the ladder into Pidia's room above Manor Lower Level.
- Speak to Pidia while he is alive and buy his one Ritual Pot for 1,500 runes. You do not need to advance Ranni to the Fingerslayer Blade handover or cause Pidia's death to use this shop.
- If Pidia has already died, collect Pidia's Bell Bearing from his body and offer it to the Twin Maiden Husks at Roundtable Hold. Buy the Ritual Pot there if it remains in his inherited stock; this does not provide a second copy.
Isolated Merchant's Shack
Dragonbarrow
Starting Site of Grace: Isolated Merchant's Shack
Before you go
- Have 3,000 runes.
- Reach the shack on Dragonbarrow's northern road.
- Buy the merchant's Ritual Pot for 3,000 runes.
Laskyar Ruins northern arches
Liurnia of the Lakes
Starting Site of Grace: Laskyar Ruins
- Reach Laskyar Ruins in southern Liurnia's shallow lake.
- Search against the wall behind the northern arches for a container.
Chest guarded by sorcerers and a Living Jar
Raya Lucaria Academy
Starting Site of Grace: Schoolhouse Classroom
- At Temple Quarter in western Liurnia, ride north to the rocky island where Glintstone Dragon Smarag is resting. Take the Academy Glintstone Key from the corpse behind the dragon; fighting Smarag is optional.
- Examine the seal at South Raya Lucaria Gate with the key in your inventory. At Main Academy Gate, ride the lift up and climb the stairs past the two sorcerers into the church. Activate Church of the Cuckoo grace in its side passage.
- Leave through the side passage into the graveyard. Follow the descending path across the wooden bridge, then climb the path on the right. Watch for enemies grabbing at you from the ground.
- At the far end, go through the passage to the huge waterwheel. Ride an ascending platform and step off at the upper landing. Enter the building on the left for Schoolhouse Classroom grace; riding down goes to a different area.
- From Schoolhouse Classroom, take the right-hand route and climb the stairs.
- Continue into the room guarded by three sorcerers and a large Living Jar. Open its chest.
Two containers in Jarburg
Liurnia of the Lakes
Starting Site of Grace: Jarburg
- Descend the gravestone ledges south of Carian Study Hall to Jarburg.
- Check the overhang at the third house on the left for one container.
- Take the other from the inert large jar just north of the grace. Do not attack the friendly villagers.
Two containers in Auriza Side Tomb
Capital Outskirts
Starting Site of Grace: Auriza Side Tomb
- From Outer Wall Battleground, ride east under the bridge leading toward Leyndell. Take the northern dungeon entrance in the low ground for Auriza Side Tomb, rather than Auriza Hero's Grave to the south.
- Go downstairs past the boss doors and through the small jars to the first chest. Let its mist move you. Descend the next stairs into the large room, then take the southwest exit to the watery room.
- Turn right beneath the platform and follow the northwest passage to the imp room. Strike the false wall in its southwest archway and use the chest downstairs behind it.
- From the balcony where you arrive, follow the short northeast passage, climb the next stairs and drop to the lower room. Go through the southeast doorway and back toward the room with the false wall. Use the chest behind that wall again.
- Drop from the balcony and use the other chest up the small stairs at the northwest end. If this takes you to two large living jars, use that chest to return, use the false-wall chest again, then try the small-stair chest once more.
- You need the enclosed version of the room with small exploding jars and a ladder. Climb that ladder and pull the lever. Drop down, climb the southeast stairs and use the chest at the top to return near the entrance.
- In the version with two large Living Jars, check the upstairs chamber for the first Ritual Pot. The similar small-jar room with the ladder leads to the boss-door lever instead.
- For the other, use the window route from the room below the boss doors and return through the false-wall chest. Reach the balcony version without the small exploding jars; if necessary, drop down and use that same chest once more.
- Follow the balcony southeast, climb the stairs and ladder and use the chest at the top. From the arrival room, continue up both stairways to the large Living Jar chamber and collect the second Ritual Pot. The two copies are fixed pickups, not rewards from repeatedly using one chest.
Giant-jar room beyond the pipe maze
Subterranean Shunning-Grounds
Starting Site of Grace: Underground Roadside
- In Leyndell, Royal Capital, start at Avenue Balcony. Descend the northwestern stairs and go through the door. Follow the railing west, then drop left onto the lower rooftops.
- Drop off the right side of the roof, turn back north and find the well behind the broken wall. Climb its ladder, open the gate in the lower passage and take the next ladder down.
- Follow the damp corridor northeast into the rat-filled sewer entrance. Go through the southeastern doorway and descend the ladder into the large Omen hallway.
- Head northeast along the hallway and enter the first room on the left, opposite the summoning statue. Activate Underground Roadside grace.
- Leave Underground Roadside and go northeast along the Omen hallway to the open floor grate. Drop into it, follow the rat tunnel northwest and take the side pipe on the right rather than the flower-filled route to Dung Eater's cell.
- Follow the slug-filled pipe. Drop through its first floor opening into the dark room, leave through the door on the left and follow the next tunnel. At the slug-blocked bend, go left and drop through the next opening beside the corpse with Rainbow Stone Arrows.
- In the lower chamber, watch for the ambusher near your landing and the Revenant farther inside. Use the tunnel in the western corner, continue through the open metal gate and follow the bends past the slugs to the square room with an Omen and ladder.
- Climb the ladder and turn right to pull the lever, opening a shortcut back to Underground Roadside. Watch for two more Omen by the statue. Take the nearby doorway into the broken spiral-stair chamber.
- Turn left and drop to the lower section of the curved stairs. Follow the short flight down and enter the passage on the right. Farther along, the downward ladder by the ledge leads to Nomad Ashes; continue into the other pipe route for Mohg.
- In the Basilisk pipes, pass the first right turn with a door that opens from the other side. Take the next right into the Omen's room. Climb its ladder, cross the wooden bridge past the Imp and open the doors back toward Underground Roadside.
- From that opened bridge, climb onto the upper pipe and follow it to the end. Drop onto the lower pipe and reach the wooden walkway by the corpse with Golden Rune (10). Enter the doorway and kick down the ladder to make another shortcut.
- Drop onto the pipe below this platform, then through the opening in its top. Inside, take the northeastern direction from your landing. Follow the pipe as it bends southeast, then northeast to the fork beside Golden Rune (11).
- Take the left fork and drop through its floor opening after the small rat. The route straight toward the giant rat loops to an earlier area. The correct lower landing is beside a Commoner and Smithing Stone (5).
- Open the nearby gate for a shortcut, then follow the passage northeast. Climb down the ladder to the room with living jars and take its lift down to Forsaken Depths grace.
- Before taking the final lift to Forsaken Depths, search the room with the large Living Jars for Ritual Pot. Mohg is below the lift and is unnecessary for this container.
Giants' Mountaintop Catacombs
Mountaintops of the Giants
Starting Site of Grace: Giants' Mountaintop Catacombs
- Find Giants’ Mountaintop Catacombs below the bridge approach north of Zamor Ruins. Enter, activate its grace and take the first lift down.
- At the boss doors, use the left passage and follow it to the next lift. Ride down to the lower jar rooms.
- Continue past the large Living Jar, avoid the pressure plate firing freezing arrows, then cross the corridor with three falling blades between their swings.
- Pass the Land Squirts to the final large Living Jar room. Collect Ritual Pot at the far end. The Ulcerated Tree Spirit boss is unnecessary for this pickup.
Notes
- There are ten Ritual Pot containers. Their capacity is separate from Cracked Pots and Hefty Cracked Pots.
- Using or storing a filled ritual pot frees its container. You need fresh ingredients to make another item.
- The containers carry into later journeys without raising the ten-container limit.
- Some recipes cost FP when thrown. Owning a container does not remove that cost.
- Each filled ritual pot occupies one of the ten containers. Having ten empty containers is different from having ten of every recipe ready to throw.
- Cookbooks and ingredients unlock and fill the recipe; the container does not provide free Fire damage, Poison or any other effect by itself.
- The container returns after use, but the ingredients and any FP spent on the throw do not. Resting refills the flask, not the crafting materials.
- Auriza Side Tomb contains two separate Ritual Pots in different versions of its rooms. A chest that sends you somewhere familiar has not generated a fresh container.
- Ritual Pots are not required to craft ordinary Cracked Pot recipes or the larger hefty recipes. Their separate capacities cannot be exchanged.