Development preview — content and features are still being refined.
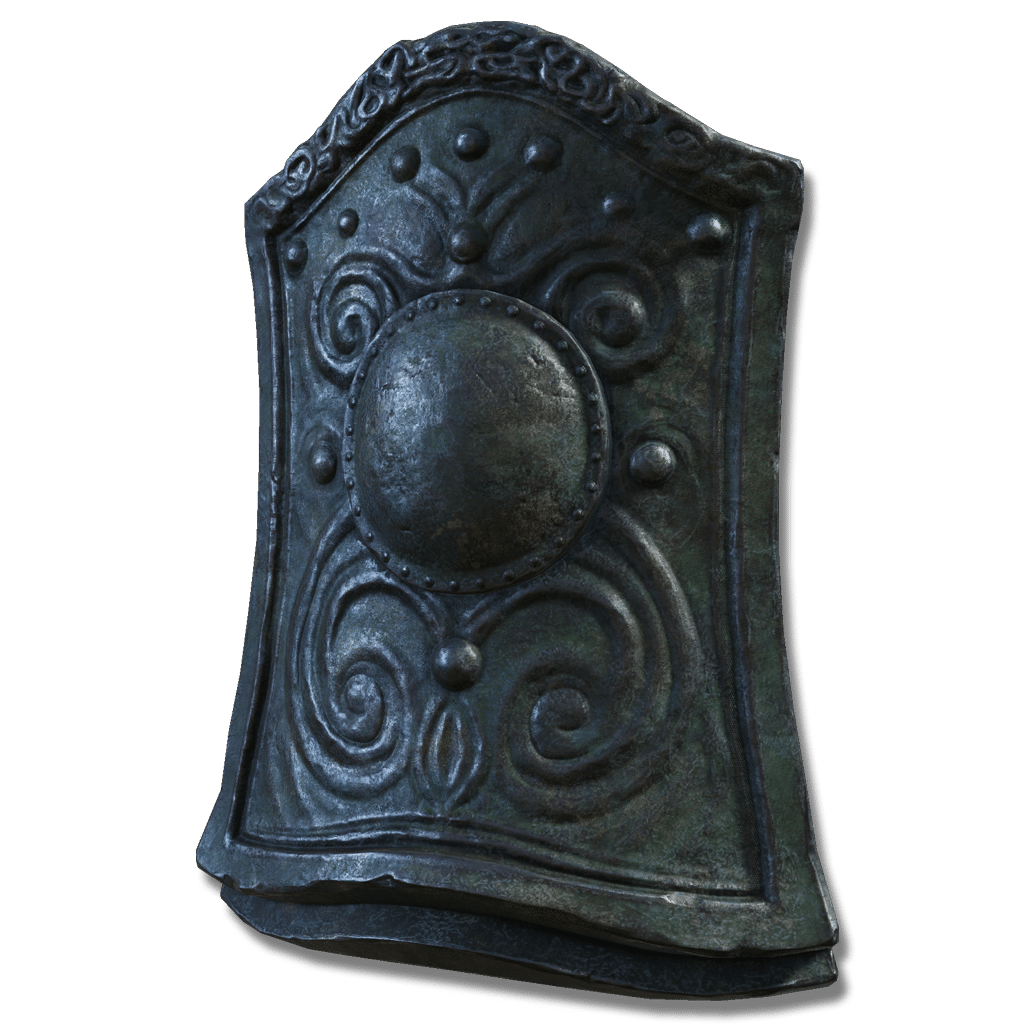 Greatshield
Weapons · Greatshield
Verdigris Greatshield
Greatshield made of the unusual metal known as verdigris.
Attack & scalingUpdates as you edit
In-game description
Greatshield made of the unusual metal known as verdigris.
Boasts greater guard capacity than damage negation. To the extent that the shield will continue to protect its target even if its bearer should die.
Skill
Ready the shield with both hands, then charge forth while maintaining guard, ending in a shove imbued with verdigris magic. Knocks back nearby enemies, but does not cause significant harm. Hold to extend the length of the charge.
Where to find
Scadu Altus
Starting Site of Grace: Highroad Cross
Before you go
- Choose Remain sad forever after the great rune and charm break.
- To enter the Realm of Shadow, defeat Starscourge Radahn and Mohg, Lord of Blood, then touch the withered arm in Mohg's arena at Mohgwyn Palace.
- From Three-Path Cross in Gravesite Plain, take the western road through the rocky passage toward Belurat. Activate Main Gate Cross and speak to Moore, the heavily armored merchant sitting near the cross.
- Finish any shopping, Black Syrup business and friendly Forager Brood cookbook collection you want before deciding his outcome. Approaching Shadow Keep breaks Miquella's great rune and charm, which makes the later conversation available.
- Return to Moore after the charm-breaking message. If you want more time, answer I do not know or leave the choice unanswered; the other answers lead to his two different final locations.
- Choose Remain sad forever. Rest or travel away so the area reloads; this choice ends his friendly role rather than moving his shop to another camp.
- From Highroad Cross, ride northwest uphill toward Church of the Crusade, west of the main road to Shadow Keep. If Fire Knight Queelign invades near the church, deal with the invasion before trying to rest or travel.
- Go around the church's northern side toward the cliff edge. Look for the curled-up Forager Brood member near the small pools; Moore's body is beside it after he moves.
- Loot his body for Verdigris Helm, Verdigris Armor, Verdigris Gauntlets, Verdigris Greaves, Verdigris Greatshield and his bell bearing. No fight with Moore is needed on this branch.
Enir-Ilim
Starting Site of Grace: Cleansing Chamber Anteroom
Before you go
- Choose Put it behind you and reach the Enir-Ilim confrontation.
- To enter the Realm of Shadow, defeat Starscourge Radahn and Mohg, Lord of Blood, then touch the withered arm in Mohg's arena at Mohgwyn Palace.
- From Three-Path Cross in Gravesite Plain, take the western road through the rocky passage toward Belurat. Activate Main Gate Cross and speak to Moore, the heavily armored merchant sitting near the cross.
- Finish any shopping, Black Syrup business and friendly Forager Brood cookbook collection you want before deciding his outcome. Approaching Shadow Keep breaks Miquella's great rune and charm, which makes the later conversation available.
- Return to Moore after the charm-breaking message. If you want more time, answer I do not know or leave the choice unanswered; the other answers lead to his two different final locations.
- Choose Put it behind you. Moore later joins Leda's opposing group in Enir-Ilim rather than leaving his equipment beside the northern forager.
- Enter the Realm of Shadow after defeating Starscourge Radahn and Mohg, Lord of Blood, by touching the withered arm in Mohg's arena. Defeat Messmer in Shadow Keep for his kindling and Romina at Church of the Bud in the Ancient Ruins of Rauh.
- Finish the companion quest steps you want before burning the Sealing Tree behind Romina with Messmer's Kindling. This advances their quests and carries you to Enir-Ilim: Outer Wall.
- From Outer Wall, climb northeast to the large balcony, then southwest up the next stairs. Turn southeast toward the Divine Bird Warrior and enter the building beyond it. Climb the broken ledges and cross the balcony to First Rise grace.
- From First Rise, take the stairs upward through the building and use the southwest doorway toward the courtyard route. Continue through to the courtyard with the large patrolling inquisitor and the smaller enemies praying below.
- Take the upward stairs on the courtyard's southeastern side, rather than the lower tree detour. Use the stone railings for cover from the inquisitors' rapid spells, then continue up beside the large tree to the Divine Beast Warrior.
- Get past the warrior and climb northwest. Keep moving when the upper inquisitors cast attacks beneath your feet. Open the large double doors at the top of the stairs and activate Spiral Rise grace.
- Climb the spiral stairs and leave through the window before the broken floor. Follow the roof southwest around the building, then jump west to the wider roof. Draw out the Gravebirds one at a time instead of fighting all three at the corner.
- Continue northwest from the roofs onto the platform with another bird and stairs. Climb the northern stairs, then the next flight toward the frost-wielding Divine Beast Warrior. The drop over the railing is an optional Spirit Ash detour.
- Get past the warrior. From the small structure northwest of it, go east to the corpse with Sunwarmth Stones and climb the roof beside it. Enter the tower through its southeastern windows.
- Climb the stairs inside the tower and clear the inquisitors around the lift. This is the lift above the large altar, before the final wind-wielding warrior and Cleansing Chamber Anteroom.
- Continue south-southwest up the tower's stairs and go outside. Get past the wind-wielding Divine Beast Warrior on the large platform and enter the building above it for Cleansing Chamber Anteroom grace. The lift down to the altar is an optional helmet detour.
- Climb the stairs east from Cleansing Chamber Anteroom and enter the sandy chamber. Finish Leda's dialogue. Use any available gold ally signs if you want help, then interact with the red sign to begin the battle against her and her allies.
- Defeat the group and return to your world. Loot the bodies left around the chamber before taking the eastern exit.
- After winning the group battle, search Moore's body in the chamber for all four Verdigris armor pieces, Verdigris Greatshield and his bell bearing.
Realm of Shadow
Starting Site of Grace: Main Gate Cross
Before you go
- Provoke Moore by killing two friendly Forager Brood members while his invasion remains available.
- This is a destructive alternative to Moore's two dialogue branches. Killing friendly Forager Brood members costs their cookbook rewards, so collect the books first if you intend to use this route.
- After killing two of the friendly brood, defeat Moore when he invades. His invasion drops the Verdigris equipment, including the greatshield, but does not provide his bell bearing.
Notes
- Requires 49 Strength and weighs 28. Two-handing meets the Strength requirement at 33 actual Strength, but using it one-handed beside a weapon still needs the full 49.
- Blocks 100% physical damage and has 82 Guard Boost before reinforcement, reaching 90 at +10. This makes it especially good at conserving stamina against blocked attacks. Guard Boost reduces stamina loss rather than HP damage from unblocked attacks.
- Its elemental blocking is 72% Magic, 74% Fire, 67% Lightning and 68% Holy. It has better stamina protection than Fingerprint Stone Shield but weaker elemental protection. Neither shield prevents damage from an attack that bypasses your guard.
- Moore's Charge costs 16 FP. Hold the skill to travel farther and make more rushing contacts before the final shove and wide shockwave. Its purpose is to push enemies back and deal stance or guard-stamina damage, rather than inflict HP damage.
- Do not mistake the green shockwave for a Faith-scaling holy or magic attack. The skill's contacts do not have normal HP damage to improve with damage talismans, while ordinary shield strikes deal physical damage and scale with Strength.
- The charge guards while moving, but it can still be guard-broken. More travel also spends more stamina. Leave enough to defend yourself when it ends, especially against an enemy that cannot be pushed away.
- Upgrade with Somber Smithing Stones to +10. Its skill and affinity are fixed, so No Skill, Shield Bash and Shield Crash cannot replace Moore's Charge. Shield-specific defensive buffs are a separate option from changing its Ash of War.
- You do not need to wear Verdigris armor for the shield to work. The armor's weight and Verdigris Discus' load-based defense are separate from the shield's Guard Boost.
- Moore's grief response determines the non-invasion pickup: Remain sad forever places his body beside the northern forager, while Put it behind you makes him an opponent in the later group battle. Delaying the answer keeps time for shopping and cookbook conversations.
- Finish the friendly Forager Brood books and Moore's seventh cookbook before ending his quest. His equipment and bell bearing do not replace the conversations needed for those rewards.
Related Equipment
 Dragon TowershieldGreatshieldCalculating at min req stats
 Distinguished GreatshieldGreatshieldCalculating at min req stats
 Crucible HornshieldGreatshieldCalculating at min req stats
 Dragonclaw ShieldGreatshieldCalculating at min req stats
 Briar GreatshieldGreatshieldCalculating at min req stats
 Erdtree GreatshieldGreatshieldCalculating at min req stats
Advertisement